Deploy cert-manager on Google Kubernetes Engine (GKE) and create SSL certificates for Ingress using Let's Encrypt
Last Verified: 15 July 2022
In this tutorial you will learn how to deploy and configure cert-manager on Google Kubernetes Engine (GKE). You will learn how to configure cert-manager to get a signed SSL certificate from Let's Encrypt, using an HTTP-01 challenge. Finally you will learn how the certificate can be used to serve an HTTPS website with a public domain name.
Google Cloud: A suite of cloud computing services by Google.
Kubernetes: Runs on your servers. Automates the deployment, scaling, and management of containerized applications.
cert-manager: Runs in Kubernetes. Obtains TLS / SSL certificates and ensures the certificates are valid and up-to-date.
Let’s Encrypt: An Internet service. Allows you to generate free short-lived SSL certificates.
First you will create a Kubernetes (GKE) cluster and deploy a sample web server.
You will then create a public IP address and a public domain name for your website.
You'll set up Ingress and Google Cloud load balancers so that Internet clients can connect to the web server using HTTP.
Finally you will use cert-manager to get an SSL certificate from Let's Encrypt
and configure the load balancer to use that certificate.
By the end of this tutorial you will be able to connect to your website from the Internet using an https:// URL.
Prerequisites
💻 Google Cloud account
You will need a Google Cloud account. Registration requires a credit card or bank account details. Visit the Get started with Google Cloud page and follow the instructions.
💵 If you have never used Google Cloud before, you may be eligible for the Google Cloud Free Program, which gives you a 90 day trial period that includes $300 in free Cloud Billing credits to explore and evaluate Google Cloud.
💻 Domain Name
You will need a domain name and the ability to create DNS records in that domain. We will be getting a $12 domain name from Google Domains. Google Domains is one of the many possible "domain name registrars". NameCheap and GoDaddy are two other well-known registrars.
💵 If you prefer not purchasing a domain name, it is also possible to adapt this tutorial to use the IP address to serve your website and for the SSL certificate.
💻 Software
You will also need to install the following software on your laptop:
- gcloud: A set of tools to create and manage Google Cloud resources.
- kubectl: The Kubernetes command-line tool which allows you to configure Kubernetes clusters.
- curl: A command-line tool for connecting to a web server using HTTP and HTTPS.
ℹ️ Try running
gcloud components install kubectlto quickly installkubectl.
0. Configure gcloud with a Google Cloud project
If you don't have a Google Cloud account, the command below will create one for you:
gcloud init
You will need to answer "yes" to the following question:
Do you want to configure a default Compute Region and Zone? (Y/n)? Y
After running the command, you will shown the project name, default region, and default zone.
Example output:
* Commands that require authentication will use firstname.lastname@example.com by default* Commands will reference project `your-project` by default* Compute Engine commands will use region `europe-west1` by default* Compute Engine commands will use zone `europe-west1-b` by default
In this tutorial, we will refer to the name of the project that was selected while running gcloud init with the variable PROJECT. Where ever you see $PROJECT in a command, you need to either (1) replace the variable manually before you execute the command,
or (2) export the variable in your shell session. This applies to all environment variables that you will encounter in the commands listed in this tutorial.
We will go with option (2), so we need to export the environment variables before continuing using the information that was printed by gcloud init:
export PROJECT=your-project # Your Google Cloud project ID.export REGION=europe-west1 # Your Google Cloud region.
1. Create a Kubernetes Cluster
To get started, let's create a Kubernetes cluster in Google Cloud. You will need to pick a name for your cluster. Here, we will go with "test-cluster-1". Let us save it in an environment variable:
export CLUSTER=test-cluster-1
Now, create the cluster using the following command:
gcloud container clusters create $CLUSTER --preemptible --num-nodes=1
Set up the Google Kubernetes Engine auth plugin for kubectl:
gcloud components install gke-gcloud-auth-pluginexport USE_GKE_GCLOUD_AUTH_PLUGIN=Truegcloud container clusters get-credentials $CLUSTER
Now check that you can connect to the cluster:
kubectl get nodes -o wide
⏲ It will take 4-5 minutes to create the cluster.
💵 To minimize your cloud bill, this command creates a 1-node cluster using a preemptible virtual machine which is cheaper than a normal virtual machine.
2. Deploy a sample web server
We will deploy a very simple web server which responds to HTTP requests with "hello world!".
kubectl create deployment web --image=gcr.io/google-samples/hello-app:1.0
We also need to create a Kubernetes Service, so that connections can be routed to the web server Pods:
kubectl expose deployment web --port=8080
ℹ️ These kubectl imperative commands are used for readability and brevity. Feel free to use YAML manifests and
kubectl apply -finstead.ℹ️ The Service created by
kubectl exposewill be of typeClusterIP(the default) and this is only reachable by components within the cluster. Later we will create an Ingress which is how we make the service available to clients outside the cluster.🔰 Read more about Using a Service to Expose Your App.
3. Create a static external IP address
This tutorial is about creating a public facing HTTPS website with a Let's Encrypt SSL certificate using the HTTP01 challenge mechanism, so we need a public IP address so that both Let's Encrypt and other Internet clients can connect to your website.
It is easy to create a public IP address in Google Cloud and later we will associate it with your website domain name and with a Google Cloud load balancer, which will accept HTTP(S) connections from Internet clients and proxy the requests to the web servers running in your cluster.
Create a global static IP address as follows:
gcloud compute addresses create web-ip --global
You should see the new IP address listed:
gcloud compute addresses list
⚠️ You MUST create a
globalIP address because that is a prerequisite of the External HTTP(S) Load Balancer which we will be using in this tutorial.💵 Global static IP addresses are only available in the Premium network service tier and are more expensive than ephemeral and standard public IP addresses.
🔰 Read more about Network service tiers in Google Cloud.
🔰 Read more about Reserving a static external IP address in Google Cloud.
Finally, we will save the IP address into an environment variable for later use. Display the IP address with the following command:
gcloud compute addresses describe web-ip --format='value(address)' --global
Then, copy the output and save it into an environment variable:
export IP_ADDRESS=198.51.100.1 # Replace with your IP address
4. Create a domain name for your website
You will need a domain name for your website and Let's Encrypt checks your domain before it signs your SSL certificate, so the domain name needs to be reachable from the Internet.
We will purchase a cheap domain name using a credit card. Go to https://domains.google.com, and type something in the search box. For the example, we searched for hello-app.com because the example container that we will be deploying is called hello-app. Most importantly, we make sure to sort the domain names by price:
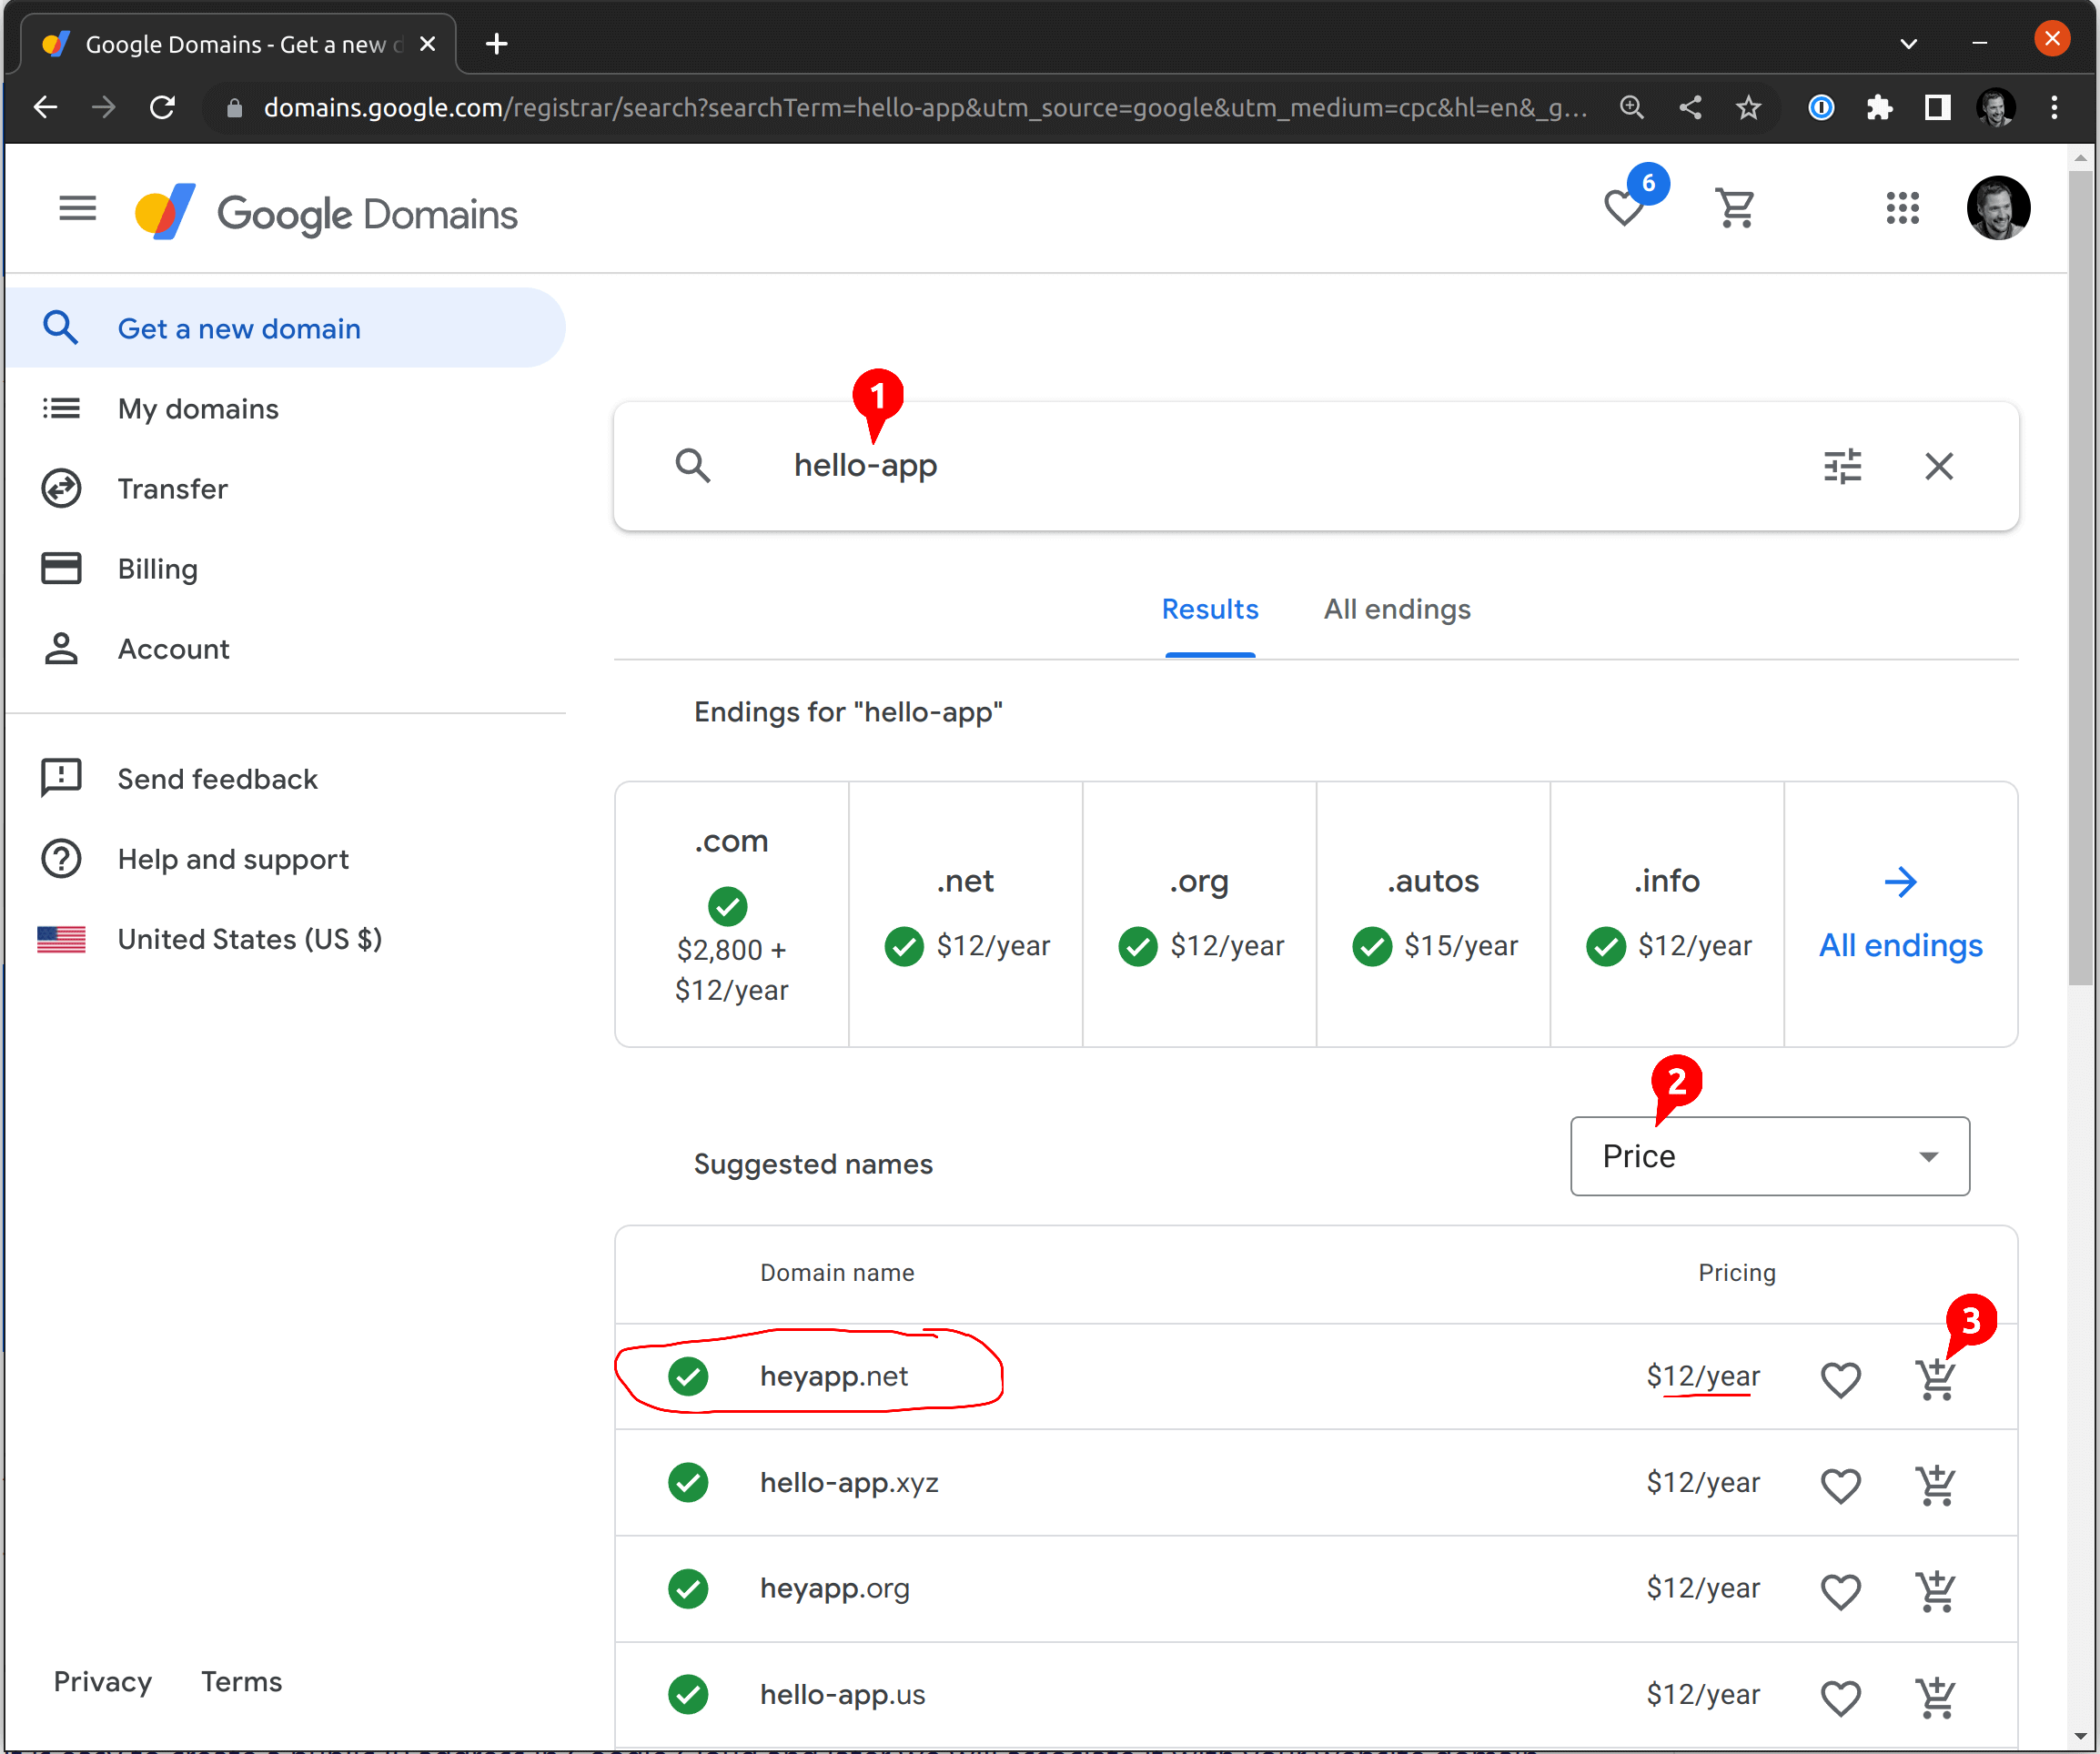
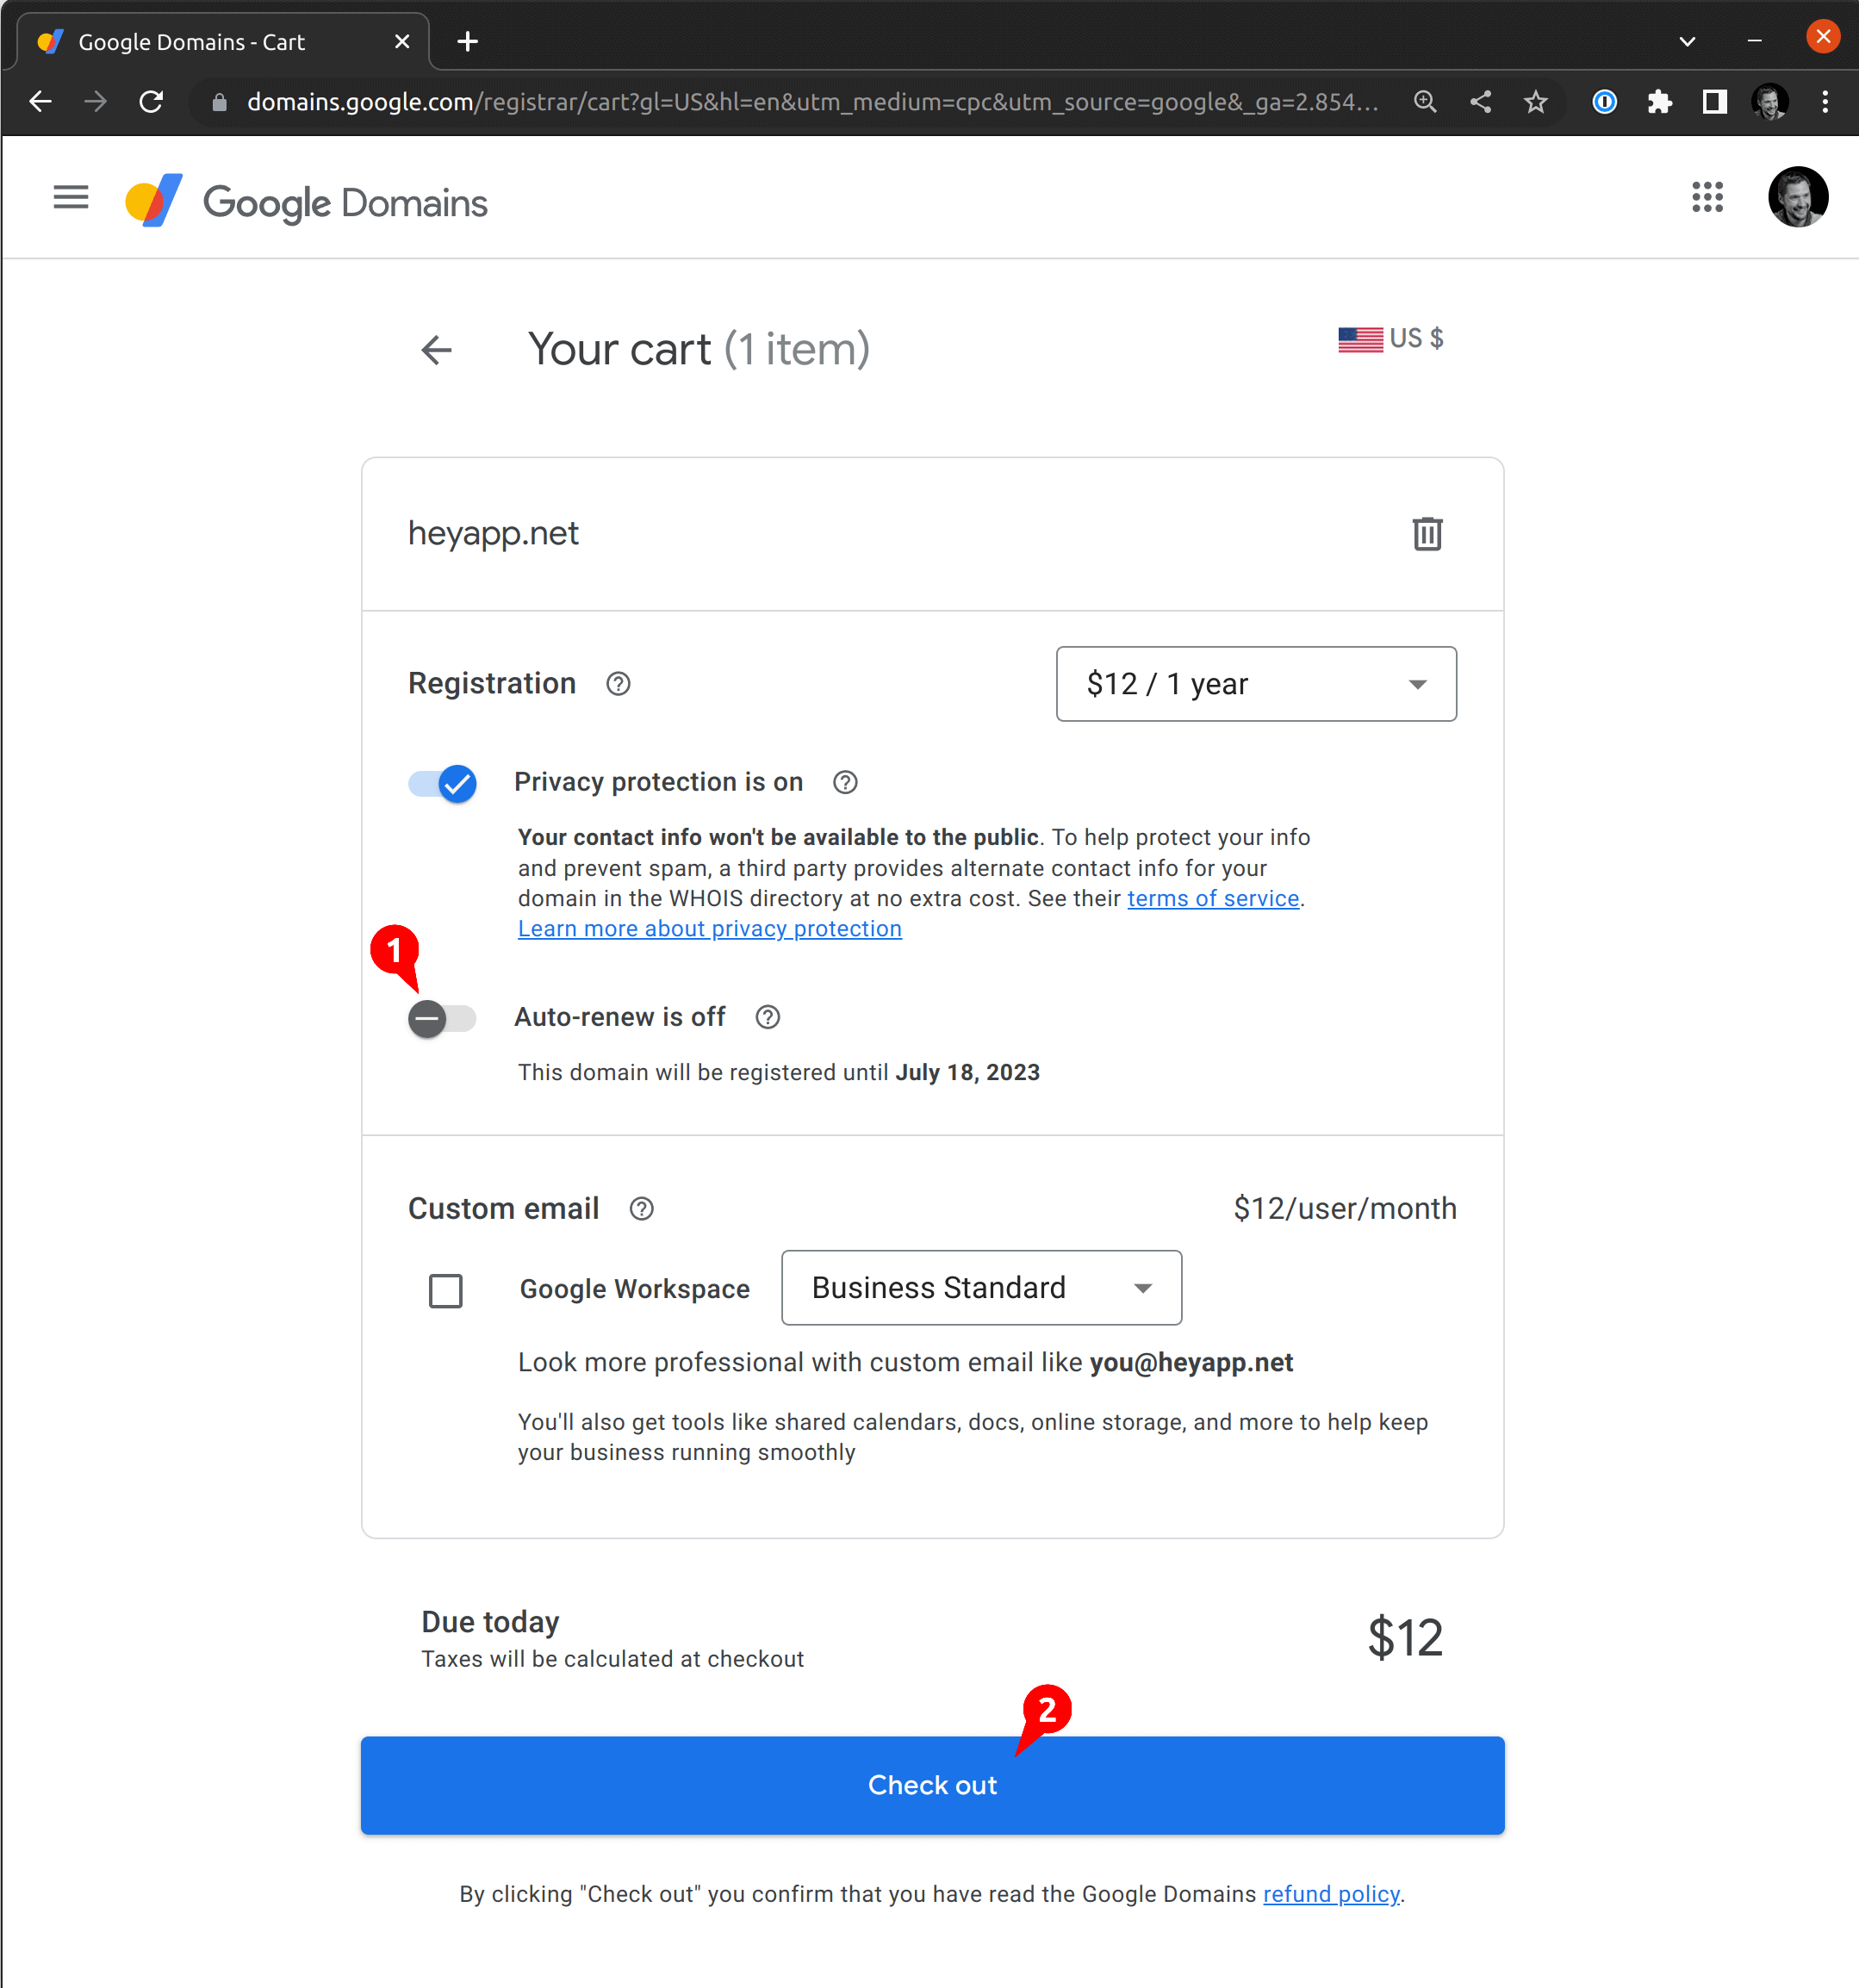
We don't pick hello-app.com because it costs $2,800; instead, we go with the one at the top: heyapp.net. It looks good! We then click the cart button. On the next screen, you will want to disable the auto-renewal, since we don't want to pay for this domain every year:
Now that you know your domain name, save it in an environment variable:
export DOMAIN_NAME=heyapp.net
Next, you will need to create a new A record pointing at the IP address that we created above. Head back to https://domains.google.com/registrar, open your domain (here, heyapp.net) and click "DNS" on the left menu. You will see "Custom records". You want to add a new record of type A and put the IP address from the previous step into "data". You must leave "Host name" empty because we are configuring the top-level domain name:
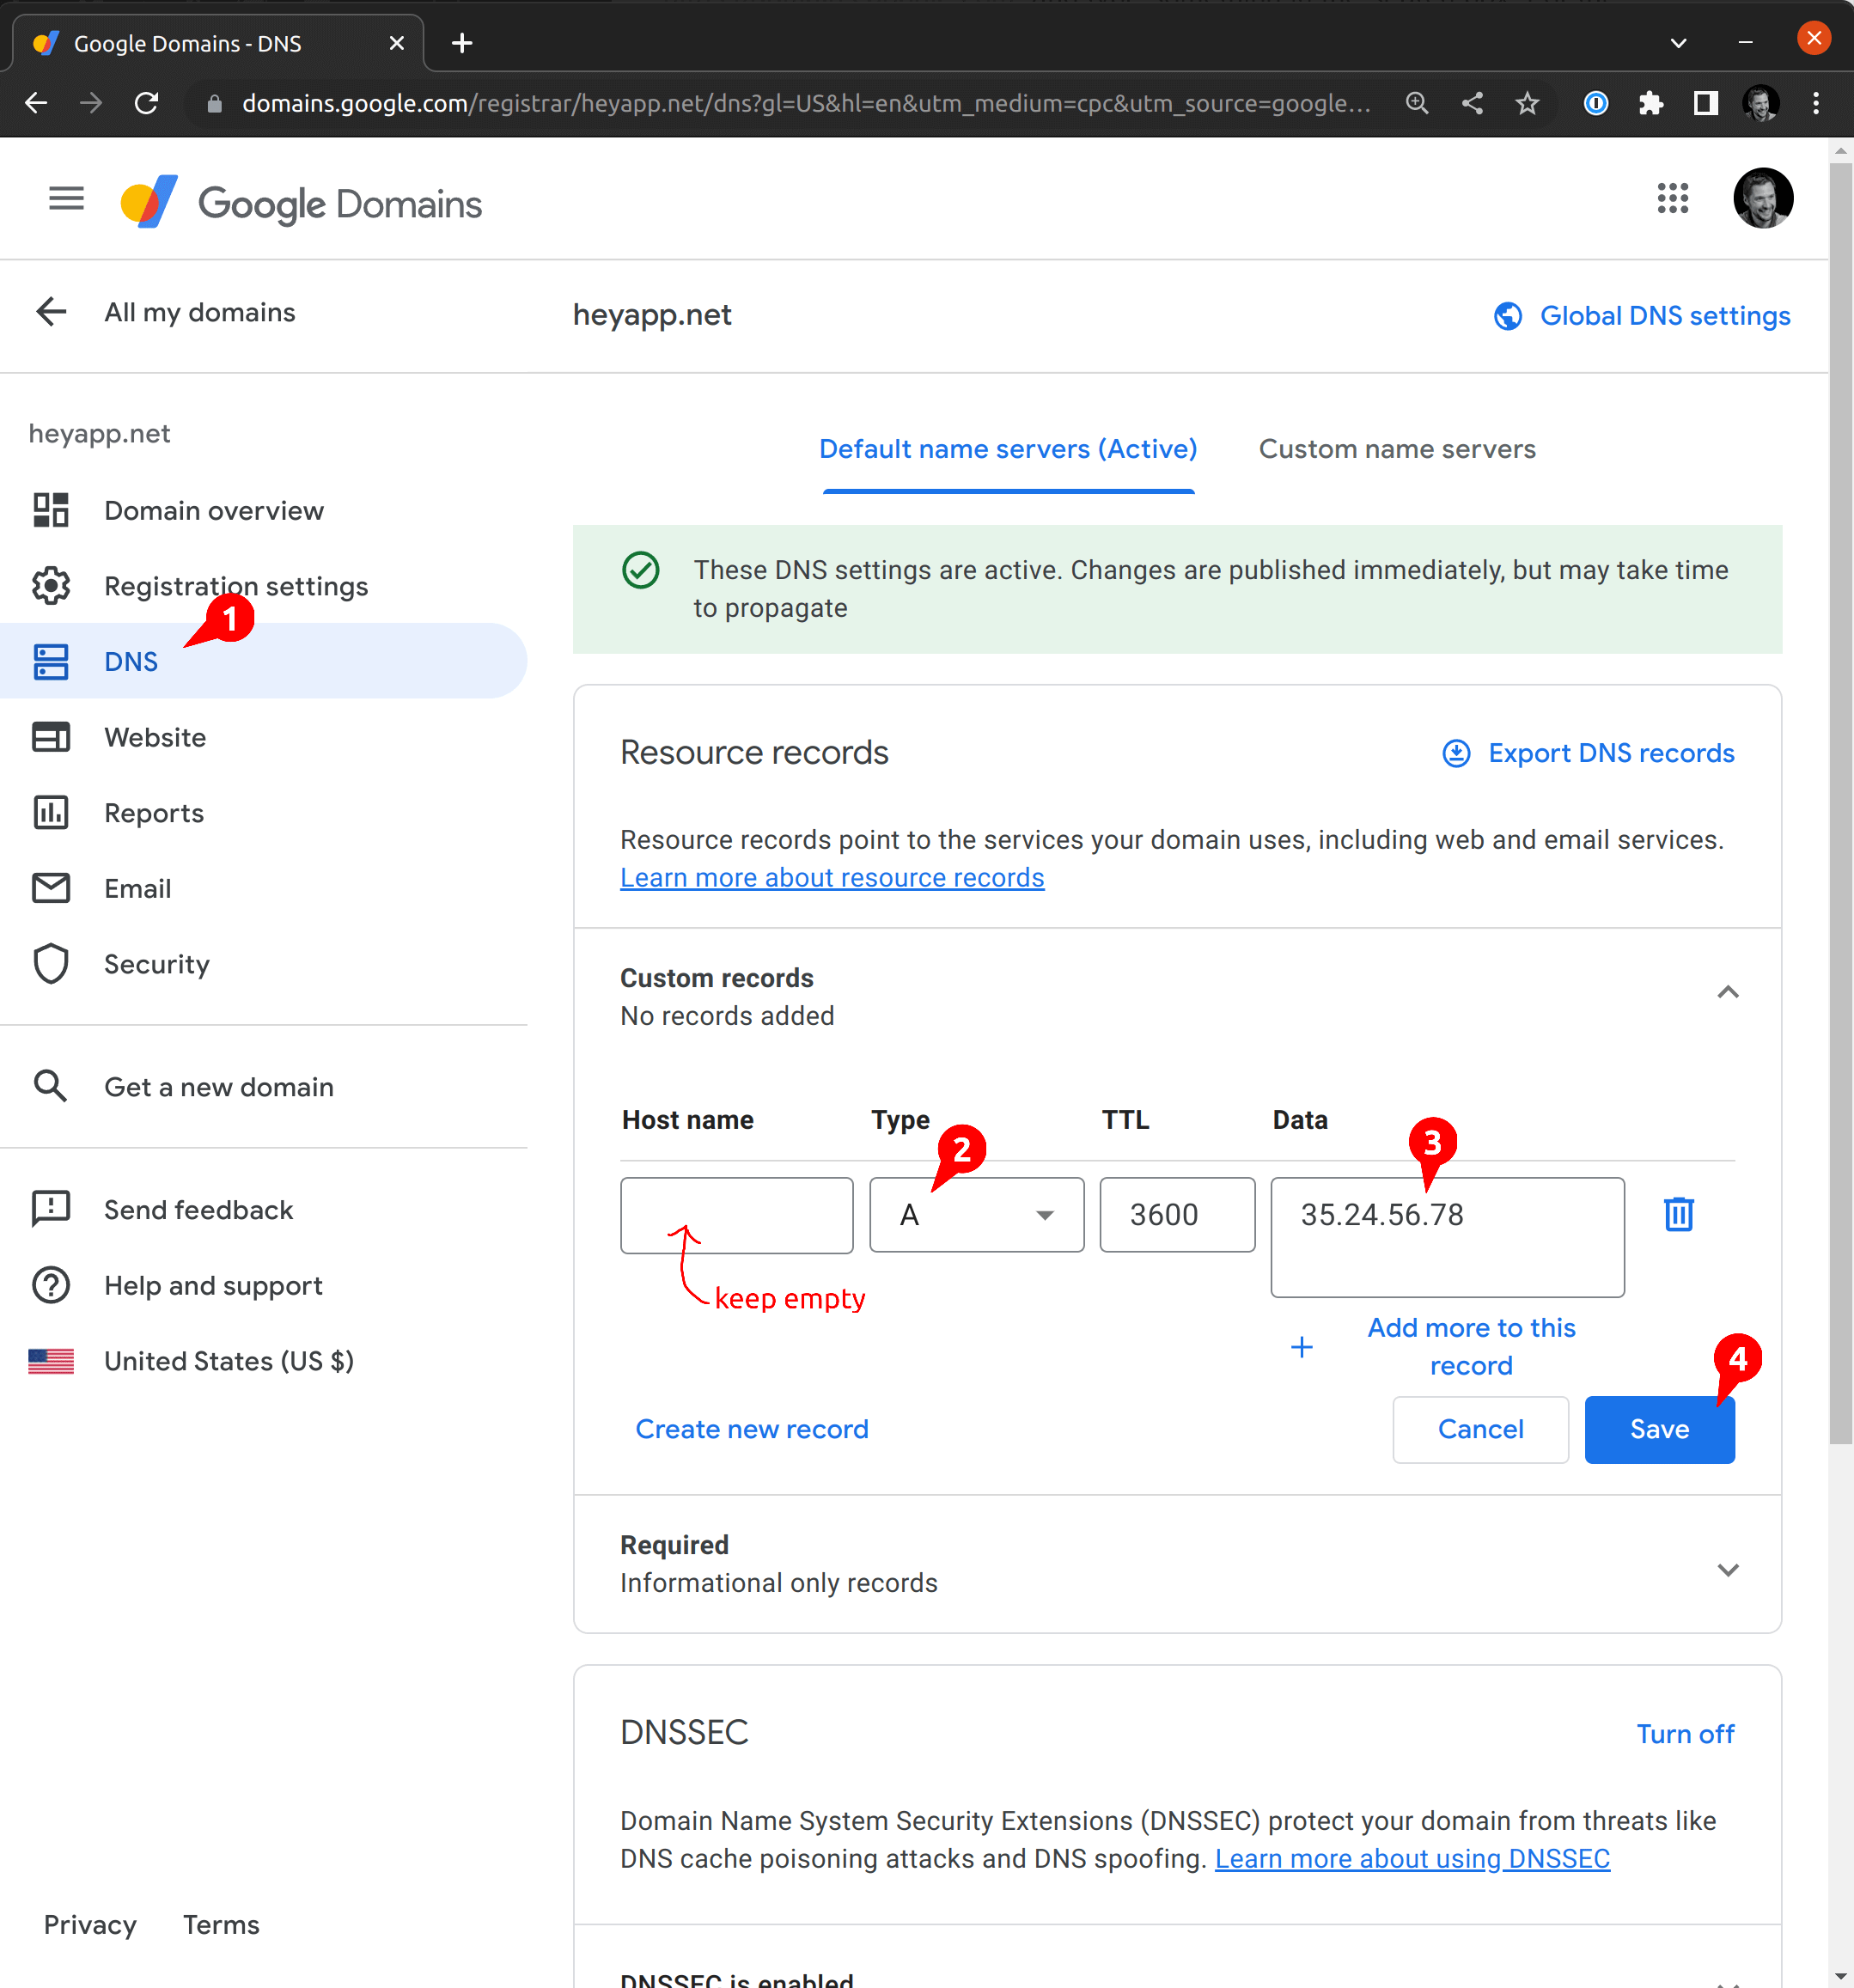
🔰 Learn more about What is a DNS A record? from the Cloudflare DNS tutorial.
ℹ️ It is not strictly necessary to create a domain name for your website. You can connect to it using the IP address and later you can create an SSL certificate for the IP address instead of a domain name. If for some reason you can't create a domain name, then feel free to skip this section and adapt the instructions below to use an IP address instead.
ℹ️ Every Google Cloud address has an automatically generated reverse DNS name like
51.159.120.34.bc.googleusercontent.com, but the parent domaingoogleusercontent.comhas a CAA record which prevents Let's Encrypt from signing certificates for the sub-domains. See Certificate Authority Authorization (CAA) in the Let's Encrypt documentation.
5. Create an Ingress
You won't be able to reach your website yet. Your web server is running inside your Kubernetes cluster but there is no route or proxy through which Internet clients can connect to it, yet! Now we will create a Kubernetes Ingress object and in Google Cloud this will trigger the creation of a various services which together allow Internet clients to reach your web server running inside your Kubernetes cluster.
Initially we are going to create an HTTP (not an HTTPS) Ingress so that we can test the basic connectivity before adding the SSL layer.
Copy the following YAML into a file called ingress.yaml and apply it:
# ingress.yamlapiVersion: networking.k8s.io/v1kind: Ingressmetadata:name: web-ingressannotations:# This tells Google Cloud to create an External Load Balancer to realize this Ingresskubernetes.io/ingress.class: gce# This enables HTTP connections from Internet clientskubernetes.io/ingress.allow-http: "true"# This tells Google Cloud to associate the External Load Balancer with the static IP which we created earlierkubernetes.io/ingress.global-static-ip-name: web-ipspec:defaultBackend:service:name: webport:number: 8080
kubectl apply -f ingress.yaml
This will trigger the creation of a Google HTTP(S) loadbalancer associated with the IP address that you created earlier. You can watch the progress and the resources that are being created:
kubectl describe ingress web-ingress
Within 4-5 minutes all the load balancer components should be ready and you should be able to connect to the DNS name and see the response from the hello-world web server that we deployed earlier:
curl http://$DOMAIN_NAME
Example output:
Hello, world!Version: 1.0.0Hostname: web-79d88c97d6-t8hj2
At this point we have a Google load balancer which is forwarding HTTP traffic to the hello-world web server running in a Pod in our cluster.
⏲ It may take 4-5 minutes for the load balancer components to be created and configured and for Internet clients to be routed to your web server. Refer to the Troubleshooting section if it takes longer.
🔰 Read about how to Use a static IP addresses for HTTP(S) load balancers via Ingress annotation.
🔰 Read a Summary of external Ingress annotations for GKE.
🔰 Read about Troubleshooting Ingress with External HTTP(S) Load Balancing on GKE.
ℹ️ There are two Ingress classes available for GKE Ingress. The
gceclass deploys an external load balancer and thegce-internalclass deploys an internal load balancer. Ingress resources without a class specified default togce.⚠️ Contrary to the Kubernetes Ingress documentation, you MUST use the
kubernetes.io/ingress.classannotation rather than theIngress.Spec.IngressClassNamefield. See ingress-gce #1301 and ingress-gce #1337.
6. Install cert-manager
So finally we are ready to start creating an SSL certificate for our website.
The first thing you need to do is install cert-manager, and we'll install it the easy using kubectl as follows:
kubectl apply -f https://github.com/cert-manager/cert-manager/releases/download/v1.14.4/cert-manager.yaml
This will create three Deployments, and a bunch of Services and Pods in a new namespace called cert-manager.
It also installs various cluster scoped supporting resources such as RBAC roles and Custom Resource Definitions.
You can view some of the resources that have been installed as follows:
kubectl -n cert-manager get all
And you can explore the Custom Resource Definitions (cert-manager's API) using kubectl explain, as follows:
kubectl explain Certificatekubectl explain CertificateRequestkubectl explain Issuer
🔰 Read about other ways to install cert-manager.
🔰 Read more about Certificates and Issuers.
7. Create an Issuer for Let's Encrypt Staging
An Issuer is a custom resource which tells cert-manager how to sign a Certificate. In this case the Issuer will be configured to connect to the Let's Encrypt staging server, which allows us to test everything without using up our Let's Encrypt certificate quota for the domain name.
ℹ️ Let's Encrypt uses the Automatic Certificate Management Environment (ACME) protocol which is why the configuration below is under a key called
acme.
Save the following content to a file called issuer-lets-encrypt-staging.yaml, change the email field to use your email address and apply it:
# issuer-lets-encrypt-staging.yamlapiVersion: cert-manager.io/v1kind: Issuermetadata:name: letsencrypt-stagingspec:acme:server: https://acme-staging-v02.api.letsencrypt.org/directoryemail: <email-address> # ❗ Replace this with your email addressprivateKeySecretRef:name: letsencrypt-stagingsolvers:- http01:ingress:name: web-ingress
kubectl apply -f issuer-lets-encrypt-staging.yaml
ℹ️ The email address is only used by Let's Encrypt to remind you to renew the certificate after 30 days before expiry. You will only receive this email if something goes wrong when renewing the certificate with cert-manager.
You can check the status of the Issuer:
kubectl describe issuers.cert-manager.io letsencrypt-staging
Example output
Status:Acme:Last Registered Email: firstname.lastname@example.comUri: https://acme-staging-v02.api.letsencrypt.org/acme/acct/60706744Conditions:Last Transition Time: 2022-07-13T16:13:25ZMessage: The ACME account was registered with the ACME serverObserved Generation: 1Reason: ACMEAccountRegisteredStatus: TrueType: Ready
ℹ️ The Let's Encrypt production issuer has very strict rate limits. When you're experimenting and learning, it can be very easy to hit those limits. Because of that risk, we'll start with the Let's Encrypt staging issuer, and once we're happy that it's working we'll switch to the production issuer.
⚠️ In the next step you will see a warning about untrusted certificates because we start with the staging issuer, but that's totally expected.
🔰 Read more about configuring the ACME Issuer.
8. Re-configure the Ingress for SSL
Earlier we created an Ingress and saw that we could connect to our web server using HTTP. Now we will reconfigure that Ingress for HTTPS.
First a quick hack, to work around a problem with the Google Cloud ingress controller. Create an empty Secret for your SSL certificate before reconfiguring the Ingress and apply it:
# secret.yamlapiVersion: v1kind: Secretmetadata:name: web-ssltype: kubernetes.io/tlsstringData:tls.key: ""tls.crt: ""
kubectl apply -f secret.yaml
ℹ️ This is a work around for a chicken-and-egg problem, where the ingress-gce controller won't update its forwarding rules unless it can first find the Secret that will eventually contain the SSL certificate. But Let's Encrypt won't sign the SSL certificate until it can get the special
.../.well-known/acme-challenge/...URL which cert-manager adds to the Ingress and which must then be translated into Google Cloud forwarding rules, by the ingress-gce controller.🔰 Read more about Kubernetes Secrets and how to use them.
Now make the following changes to the Ingress and apply them:
--- a/ingress.yaml+++ b/ingress.yaml@@ -7,7 +7,12 @@ metadata:kubernetes.io/ingress.class: gcekubernetes.io/ingress.allow-http: "true"kubernetes.io/ingress.global-static-ip-name: web-ip+ cert-manager.io/issuer: letsencrypt-stagingspec:+ tls:+ - secretName: web-ssl+ hosts:+ - $DOMAIN_NAMEdefaultBackend:service:name: web
kubectl apply -f ingress.yaml
This triggers a complex set of operations which may take many minutes to eventually complete. Some of these steps take 2-3 minutes and some will initially fail. They should all eventually succeed because cert-manager and ingress-gce (the Google Cloud ingress controller) will periodically re-reconcile.
Eventually, When all the pieces are in place, you should be able to use curl to check the HTTPS connection to your website:
curl -v --insecure https://$DOMAIN_NAME
You should see that the HTTPS connection is established but that the SSL certificate is not trusted;
that's why you use the --insecure flag at this stage
Example output:
* Server certificate:* subject: CN=www.example.com* start date: Jul 14 08:52:29 2022 GMT* expire date: Oct 12 08:52:28 2022 GMT* issuer: C=US; O=(STAGING) Let's Encrypt; CN=(STAGING) Artificial Apricot R3* SSL certificate verify result: unable to get local issuer certificate (20), continuing anyway.
⏲ You will have to wait 5-10 minutes for the SSL certificate to be signed and then loaded by the Google Cloud load balancer. Refer to the Troubleshooting section if it takes longer.
ℹ️ Adding the annotation
cert-manager.io/issuer: letsencrypt-stagingmarks the Ingress for the attention of the cert-manageringress-shimand causes it to create a new Certificate with a reference to the Issuer that we created earlier.🔰 Read Securing Ingress Resources to learn more.
🔰 Read about how to Specify certificates for your Ingress in GKE.
9. Create a production ready SSL certificate
Now that everything is working with the Let's Encrypt staging server, we can switch to the production server and get a trusted SSL certificate.
Create a Let's Encrypt production Issuer and apply it:
# issuer-lets-encrypt-production.yamlapiVersion: cert-manager.io/v1kind: Issuermetadata:name: letsencrypt-productionspec:acme:server: https://acme-v02.api.letsencrypt.org/directoryemail: <email-address> # ❗ Replace this with your email addressprivateKeySecretRef:name: letsencrypt-productionsolvers:- http01:ingress:name: web-ingress
kubectl apply -f issuer-lets-encrypt-production.yaml
Then update the Ingress annotation to use the production Issuer:
kubectl annotate ingress web-ingress cert-manager.io/issuer=letsencrypt-production --overwrite
This will trigger cert-manager to get a new SSL certificate signed by the Let's Encrypt production CA and store it to the web-ssl Secret.
Within about 10 minutes, this new certificate will be synced to the Google Cloud load balancer and you will be able to connect to the website using secure HTTPS:
curl -v https://$DOMAIN_NAME
Example output:
...* Server certificate:* subject: CN=www.example.com* start date: Jul 14 09:44:29 2022 GMT* expire date: Oct 12 09:44:28 2022 GMT* subjectAltName: host "www.example.com" matched cert's "www.example.com"* issuer: C=US; O=Let's Encrypt; CN=R3* SSL certificate verify ok....Hello, world!Version: 1.0.0Hostname: web-79d88c97d6-t8hj2
It should also be possible to visit https://$DOMAIN_NAME in your web browser, without any errors or warnings.
That concludes the tutorial. You now understand how cert-manager integrates with Kubernetes Ingress and cloud Ingress controllers. You have learned how to use cert-manager to get free Let's Encrypt SSL certificates. And you have seen how the certificates can be used by a cloud based load balancer to terminate SSL connections from Internet clients and forward HTTPS requests to a web server running in your Kubernetes cluster.
💵 Read the Clean up section to learn how to delete all the resources that you created in this tutorial and reduce your cloud bill.
🔰 Read the Troubleshooting section if you encounter difficulties with the steps described in this tutorial.
Clean up
After completing the tutorial you can clean up by deleting the cluster and the domain name and the static IP as follows:
# Delete the cluster and all the Google Cloud resources related to the Ingress that it containsgcloud container clusters delete $CLUSTER# Delete the domain namegcloud dns record-sets delete $DOMAIN_NAME --zone $ZONE --type A# Delete the static IP addressgcloud compute addresses delete web-ip --global
Troubleshooting
When you create or update the Ingress object in this tutorial it triggers a complex set of operations which may take many minutes to eventually complete.
Some of these steps take 2-3 minutes and some will initially fail but then subsequently succeed when either cert-manager or the Google ingress controller re-reconciles.
In short, you should allow 5-10 minutes after you create or change the Ingress and you should expect to see some errors and warnings when you run kubectl describe ingress web-ingress.
Here's a brief summary of the operations performed by cert-manager and ingress-gce (the Google Cloud Ingress controller):
- cert-manager connects to Let's Encrypt and sends an SSL certificate signing request.
- Let's Encrypt responds with a "challenge", which is a unique token that cert-manager must make available at a well-known location on the target web site. This proves that you are an administrator of that web site and domain name.
- cert-manager deploys a Pod containing a temporary web server that serves the Let's Encrypt challenge token.
- cert-manager reconfigures the Ingress, adding a
ruleto route requests for from Let's Encrypt to that temporary web server. - Google Cloud ingress controller reconfigures the external HTTP load balancer with that new rule.
- Let's Encrypt now connects and receives the expected challenge token and the signs the SSL certificate and returns it to cert-manager.
- cert-manager stores the signed SSL certificate in the Kubernetes Secret called
web-ssl. - Google Cloud ingress controller uploads the signed certificate and associated private key to a Google Cloud certificate.
- Google Cloud ingress controller reconfigures the external load balancer to serve the uploaded SSL certificate.
Check Ingress and associated events
Use kubectl describe to view the Ingress configuration and all the associated Events.
Check that the IP address is correct and that the TLS and Host entries match the domain name that you chose for your website.
Notice that ingress-gce creates an Event for each of the Google Cloud components that it manages.
And notice that it adds annotations with references to the ID of each of those components.
cert-manager also creates Events when it reconciles the Ingress object, including details of the Certificate object that it creates for the Ingress.
$ kubectl describe ingress web-ingressName: web-ingressLabels: <none>Namespace: defaultAddress: 34.120.159.51Ingress Class: <none>Default backend: web:8080 (10.52.0.13:8080)TLS:web-ssl terminates www.example.comRules:Host Path Backends---- ---- --------* * web:8080 (10.52.0.13:8080)Annotations: cert-manager.io/issuer: letsencrypt-stagingingress.kubernetes.io/backends: {"k8s1-01784147-default-web-8080-1647ccd2":"HEALTHY"}ingress.kubernetes.io/forwarding-rule: k8s2-fr-1lt9dzcy-default-web-ingress-yteotwe4ingress.kubernetes.io/https-forwarding-rule: k8s2-fs-1lt9dzcy-default-web-ingress-yteotwe4ingress.kubernetes.io/https-target-proxy: k8s2-ts-1lt9dzcy-default-web-ingress-yteotwe4ingress.kubernetes.io/ssl-cert: k8s2-cr-1lt9dzcy-4gjeakdb9n7k6ls7-a257650b5fefd174ingress.kubernetes.io/target-proxy: k8s2-tp-1lt9dzcy-default-web-ingress-yteotwe4ingress.kubernetes.io/url-map: k8s2-um-1lt9dzcy-default-web-ingress-yteotwe4kubernetes.io/ingress.allow-http: truekubernetes.io/ingress.class: gcekubernetes.io/ingress.global-static-ip-name: web-ipEvents:Type Reason Age From Message---- ------ ---- ---- -------Normal CreateCertificate 28m cert-manager-ingress-shim Successfully created Certificate "web-ssl"Normal Sync 28m loadbalancer-controller UrlMap "k8s2-um-1lt9dzcy-default-web-ingress-yteotwe4" updatedWarning Sync 24m (x16 over 28m) loadbalancer-controller Error syncing to GCP: error running load balancer syncing routine: loadbalancer 1lt9dzcy-default-web-ingress-yteotwe4 does not exist: googleapi: Error 404: The resource 'projects/your-project/global/sslCertificates/k8s2-cr-1lt9dzcy-4gjeakdb9n7k6ls7-e3b0c44298fc1c14' was not found, notFoundNormal Sync 34s (x16 over 65m) loadbalancer-controller Scheduled for sync
Use cmctl to show the state of a Certificate and its associated resources
ℹ️ Install
cmctlif you have not already done so.
When you create a Certificate, cert-manager will create a collection of temporary resources
which each contain information about the status of certificate signing process.
You can read more about these in the Certificate Lifecycle section.
Use the cmctl status command to view details of all these resources and all the associated Events and error messages.
You may see some temporary errors, like:
$ cmctl status certificate web-sslName: web-sslNamespace: defaultCreated at: 2022-07-14T17:30:06+01:00Conditions:Ready: False, Reason: MissingData, Message: Issuing certificate as Secret does not contain a private keyIssuing: True, Reason: MissingData, Message: Issuing certificate as Secret does not contain a private keyDNS Names:- www.example.comEvents:Type Reason Age From Message---- ------ ---- ---- -------Normal Issuing 4m37s cert-manager-certificates-trigger Issuing certificate as Secret does not contain a private keyNormal Generated 4m37s cert-manager-certificates-key-manager Stored new private key in temporary Secret resource "web-ssl-8gsqc"Normal Requested 4m37s cert-manager-certificates-request-manager Created new CertificateRequest resource "web-ssl-dblrj"Issuer:Name: letsencrypt-stagingKind: IssuerConditions:Ready: True, Reason: ACMEAccountRegistered, Message: The ACME account was registered with the ACME serverEvents: <none>error: 'tls.crt' of Secret "web-ssl" is not setNot Before: <none>Not After: <none>Renewal Time: <none>CertificateRequest:Name: web-ssl-dblrjNamespace: defaultConditions:Approved: True, Reason: cert-manager.io, Message: Certificate request has been approved by cert-manager.ioReady: False, Reason: Pending, Message: Waiting on certificate issuance from order default/web-ssl-dblrj-327645514: "pending"Events:Type Reason Age From Message---- ------ ---- ---- -------Normal cert-manager.io 4m37s cert-manager-certificaterequests-approver Certificate request has been approved by cert-manager.ioNormal OrderCreated 4m37s cert-manager-certificaterequests-issuer-acme Created Order resource default/web-ssl-dblrj-327645514Normal OrderPending 4m37s cert-manager-certificaterequests-issuer-acme Waiting on certificate issuance from order default/web-ssl-dblrj-327645514: ""Order:Name: web-ssl-dblrj-327645514State: pending, Reason:Authorizations:URL: https://acme-staging-v02.api.letsencrypt.org/acme/authz-v3/3008789144, Identifier: www.example.com, Initial State: pending, Wildcard: falseChallenges:- Name: web-ssl-dblrj-327645514-2671694319, Type: HTTP-01, Token: TKspp86xMjQzTvMVXWkezEA2sE2GSWjnld5Lt4X13ro, Key: TKspp86xMjQzTvMVXWkezEA2sE2GSWjnld5Lt4X13ro.f4bppCOm-jXasFGMKjpBE5aQlhiQBeTPIs0Lx822xao, State: pending, Reason: Waiting for HTTP-01 challenge propagation: did not get expected response when querying endpoint, expected "TKspp86xMjQzTvMVXWkezEA2sE2GSWjnld5Lt4X13ro.f4bppCOm-jXasFGMKjpBE5aQlhiQBeTPIs0Lx822xao" but got: Hello, world!Version: 1... (truncated), Processing: true, Presented: true
This is because cert-manager is performing a preflight check to see if the temporary challenge web server is reachable at the expected URL. Initially it will not be reachable, because cert-manager takes some time to deploy the temporary web server and the Ingress controller takes time to set up the new HTTP routing rules. Eventually you will see that the Certificate is Ready and signed:
$ cmctl status certificate web-sslName: web-sslNamespace: defaultCreated at: 2022-07-14T17:30:06+01:00Conditions:Ready: True, Reason: Ready, Message: Certificate is up to date and has not expiredDNS Names:- www.example.comEvents:Type Reason Age From Message---- ------ ---- ---- -------Normal Issuing 31m cert-manager-certificates-trigger Issuing certificate as Secret does not contain a private keyNormal Generated 31m cert-manager-certificates-key-manager Stored new private key in temporary Secret resource "web-ssl-8gsqc"Normal Requested 31m cert-manager-certificates-request-manager Created new CertificateRequest resource "web-ssl-dblrj"Normal Issuing 26m cert-manager-certificates-issuing The certificate has been successfully issuedIssuer:Name: letsencrypt-stagingKind: IssuerConditions:Ready: True, Reason: ACMEAccountRegistered, Message: The ACME account was registered with the ACME serverEvents: <none>Secret:Name: web-sslIssuer Country: USIssuer Organisation: (STAGING) Let's EncryptIssuer Common Name: (STAGING) Artificial Apricot R3Key Usage: Digital Signature, Key EnciphermentExtended Key Usages: Server Authentication, Client AuthenticationPublic Key Algorithm: RSASignature Algorithm: SHA256-RSASubject Key ID: a51e3621f5c1138947810f27dce425b33c88cb16Authority Key ID: de727a48df31c3a650df9f8523df57374b5d2e65Serial Number: fa8bb0b603ca2cdbfdfb2872d05ee52cda10Events: <none>Not Before: 2022-07-14T16:34:52+01:00Not After: 2022-10-12T16:34:51+01:00Renewal Time: 2022-09-12T16:34:51+01:00
Check that the SSL certificate has been copied to Google Cloud
After cert-manager receives the signed Certificate it stores in the web-ssl Secret,
and this in turn triggers the Google Cloud ingress controller to copy that SSL certificate to Google Cloud.
You can see the certificate using the gcloud command, as follows:
$ gcloud compute ssl-certificates listNAME TYPE CREATION_TIMESTAMP EXPIRE_TIME MANAGED_STATUSk8s2-cr-1lt9dzcy-4gjeakdb9n7k6ls7-a257650b5fefd174 SELF_MANAGED 2022-07-14T09:37:06.920-07:00 2022-10-12T08:34:51.000-07:00
And you can view its contents and check its attributes as follows:
$ gcloud compute ssl-certificates describe k8s2-cr-1lt9dzcy-4gjeakdb9n7k6ls7-a257650b5fefd174 --format='value(certificate)' \| openssl x509 -in - -noout -text...Certificate:Data:Version: 3 (0x2)Serial Number:04:9f:47:f1:cb:25:37:9b:86:a3:ef:bf:2e:77:3b:45:fc:1aSignature Algorithm: sha256WithRSAEncryptionIssuer: C = US, O = Let's Encrypt, CN = R3ValidityNot Before: Jul 14 17:11:15 2022 GMTNot After : Oct 12 17:11:14 2022 GMTSubject: CN = www.example.com
Check the Google Cloud forwarding-rules
After you add the TLS stanza to the Ingress object, you should eventually see a forwarding-rule for the SSL connection:
$ gcloud compute forwarding-rules describe k8s2-fs-1lt9dzcy-default-web-ingress-yteotwe4 --globalIPAddress: 34.120.159.51IPProtocol: TCPcreationTimestamp: '2022-07-14T09:37:12.362-07:00'description: '{"kubernetes.io/ingress-name": "default/web-ingress"}'fingerprint: oBTg7dRaIqI=id: '2303318464959215831'kind: compute#forwardingRulelabelFingerprint: 42WmSpB8rSM=loadBalancingScheme: EXTERNALname: k8s2-fs-1lt9dzcy-default-web-ingress-yteotwe4networkTier: PREMIUMportRange: 443-443selfLink: https://www.googleapis.com/compute/v1/projects/your-project/global/forwardingRules/k8s2-fs-1lt9dzcy-default-web-ingress-yteotwe4target: https://www.googleapis.com/compute/v1/projects/your-project/global/targetHttpsProxies/k8s2-ts-1lt9dzcy-default-web-ingress-yteotwe4